Published On Premiered Dec 28, 2022
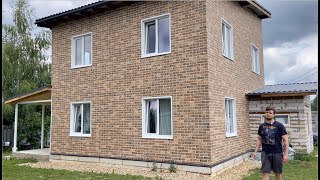
Installation of thermal panels: full version of step-by-step instructions for installing thermal panels on the facade of the house, all the nuances and secrets from #RoyalFacade
Subscribe to the channel 👉 https://bit.ly/royalfacade_youtube to learn more about clinker thermal panels!
The following tools are required for installation of thermal panels:
angle grinder, diamond and grinding wheel;
hammer drill, whisk, buckets, plastic film;
wood saw, level, tray with a fugue trowel;
a square, a knife, a marker, a level, a construction cord, and a grater for levelling the foam
0:00 👉Tools for installation
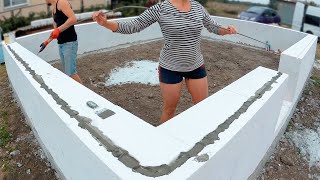
00:35 👉Forming and installing an exterior corner from wall clinker thermopanels
01:32 👉Installing exterior corner piece
01:45 👉Installing thermopanels (wall clinker thermopanel)
02:52 👉Forming a connecting insert between clinker thermal panels
04:27 👉Fitting window moldings
06:00 👉Mounting the window sill
07:40 👉Forming window sill
09:32 👉Flush joints
11:39 👉Thank you for your attention!
⚜️ Company website: https://royalfasade.ua
HEAD OFFICE
Royal Facade Ternopil
1 Chumatska St., Home Express shopping centre, 2nd floor
tel.: +380 (800) 21 7771
[email protected]
#RoyalFacade #facade insulation #thermal panels #home insulation #thermalpanels #facade