Published On Jul 16, 2024
🎁 Free Diagrams: https://cleversolarpower.com/free-dia...
📖 My Best-Selling book on Amazon: https://cleversolarpower.com/off-grid...
Parts used: (affiliate links)
400W Solar Panels: https://amzn.to/3xDznuR
PV Cable: https://amzn.to/3W6uF0D
Charge Controller: https://amzn.to/4byX8C3
Battery to Battery (B2B) Charger: https://amzn.to/4cUOLSv
Battery Charger: https://amzn.to/3S5JRKs
Inverter: https://amzn.to/3Lgc11t
Battery: https://amzn.to/4eQliL3
Fusebox: https://amzn.to/3zDrqWU
DC Breaker: https://amzn.to/4d4y72C
Midi fuse holder: https://amzn.to/4bJrdij
Busbar: https://amzn.to/4eYR9JL
MRBF terminal: https://amzn.to/3W4drAZ
MRBF fuse: https://amzn.to/3W9hH26
Midi fuses: https://amzn.to/3S9vG7c
Cables: https://amzn.to/3xQdAAa
In this video, I'm going to show you how to set up a reliable 12V electrical system for a camper van without breaking the bank. When my friend wanted a budget-friendly electrical system for his camper to travel through Italy, I came up with a solution that meets all his needs without costing a fortune.
We'll cover everything from choosing the components, what the system can run, wiring and fuse sizes, and finally, the total cost. Stick around, and I’ll walk you through each step to make it simple and affordable. Plus, I'll share the 12v van wiring diagram we used to build the system.
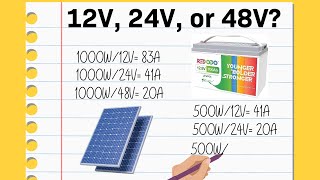
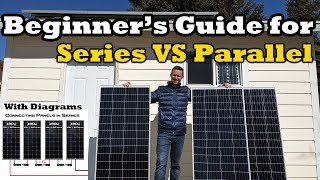
Solar: For our project, we could fit up to 400W of solar panels on the roof. We chose four 100W panels wired in parallel. This setup ensures maximum efficiency, even if one panel gets shaded. I'll also explain how to size the charge controller and ensure it can handle the maximum input voltage.
Alternator: We used a battery-to-battery charger to recharge the battery using the van's alternator. This is essential for controlling the current going into the battery, preventing damage to the alternator and wires. I'll discuss the wire and fuse sizes needed for this setup.
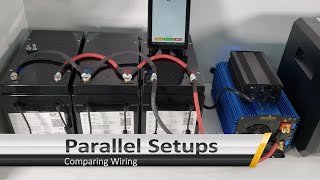
Shore Charging: For recharging the battery at a campground, we chose a standard 12V 20A lithium battery charger. This option is perfect for overnight stays.
I'll discuss the battery and inverter sizes required based on daily consumption. My friend made a list of all his devices and their usage times, including a small 12V fridge, laptop, lights, microwave, USB charger, and a 12V water pump. We decided on a 12V 200Ah lithium battery, which is more cost-effective compared to lead-acid batteries.
We also need to size the inverter to handle the surge power from the microwave. I recommended a 2000W Giandel inverter, which is budget-friendly and efficient.
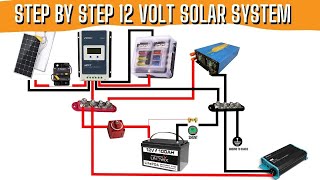
Now, let’s put everything together in a comprehensive 12v camper wiring diagram. I'll explain each step clearly, including the cables, fuses, and breakers we used.
We'll break down how long it takes to recharge the battery using different methods:
- Solar Power: About 1.5 days
- Alternator: 4.5 hours of driving
- Shore Power: 9 hours